Contents
- 1 Introduction
- 2 Signaling Server – the details
- 3 Scenarios & Tutorials
- 4 Additional Information
Introduction
There are three kinds of servers the assets WebRTC Video Chat & WebRTC Network can use. Note that the two assets are identical in their server & network requirements and if the client side is referenced it will be based on the CallApp example of WebRTC Video Chat.
Signaling server
This is a node.js server developed in-house. It uses websockets or secure websockets to allow two users to indirectly connect and exchange connection information. After that process is completed the users will establish a direct connection using WebRTC and disconnect from the signaling server. A typical use case looks like the following scenario: User A wants to talk to user B via the example CallApp:
- User A connects to the signaling server and requests an address (e.g. any kind of string of the users choice) that can be used to connect
- User A then shares this address via a messenger with user B
- User B connects to the signaling server using the address
- The signaling server will now relay messages between User A and User B and back. This is used by both sides to exchange WebRTC’s ice candidates / messages that contain a range of possible ip addresses & ports
- WebRTC on both sides will now try to use the exchanged information to connect the two users
- The users are now connected directly. The signaling connection will be cut to conserve server resources.
This all happens automatically due to the siganling server. All the user (or an external software) needs to do is exchanging a shared address that can be used to start the process. Also note that this process isn’t fixed. If you work with the IBasicNetwork & IMedaNetwork interfaces you can keep the signaling server connection alive and thus allow multiple users to connect instead just two.
Ice Server – STUN:
One of the two types of ice server. The use of STUN is part of the native WebRTC implementation and defined in RFC3489. It is needed to establish connections through a router / NAT. As most users will be behind such a device you will generally need it for any connections that aren’t inside your own LAN or WIFI. Stun servers are used during step 4 in the scenario above. They will help opening a port and find the routers ip address (also often called public ip) of each users. During the signaling process the users will exchange these IP’s with the other side and in step 5 they will then attempt to connect to them (and many other possible IP’s).
As stun servers are only used for a short moment, a single server is usually enough for many thousands of users. Because of this you can also find free stun servers online e.g. “stun:stun.l.google.com:19302” (blocked in China though). TURN servers such as the application “coturn” support STUN as well. So you won’t need two different server applications if you plan to set up your own.
Ice Server – TURN:
Second kind of ice server. TURN is usually only used if all other attempts failed under following conditions:
- Connecting via WIFI / LAN failed
- Connecting using STUN / the public IP failed
- A TURN server is available
A TURN server will be used to forward messages between two peers. This will happen entirely automatically and it won’t be visible to the user nor the software. It will look and behave exactly like a direct connection. As the data doesn’t flow directly between the two users though the latency can be much worse. This is especially true if the TURN server is far away from the users.
Note that TURN servers relay all data between individual peers. This can require a lot of traffic and can be expensive. Make sure to check with the documentation of your service provider or server software how to control costs and protect the server against abuse. This tutorial will only cover the basics and does not include these advanced topics!
Which one do I need?
If you still develop your software or you are a hobbyist who doesn’t plan to publish the software to a wide audience you won’t need any server at all and can simply keep using the default servers supplied. The only disadvantage of this is that I can’t always guarantee the servers are available as they might be overused at some point.
Other scenarios:
- The app only needs to connect to other devices in the same LAN / WIFI.:
- Signaling server is needed. No stun and no turn needed.
- The app only needs to connect to other devices in the same LAN / WIFI and it has no internet connection:
- A Signaling server needs to be setup in the LAN itself! No other server needed
- The app needs to connect online. Mainly private / home users.
- Signaling server needed + Stun server (you could use a free one). Turn server is optional. Perhaps around 5-10% of users might be unable to connect without the TURN server(s). Note that even AAA game companies often don’t bother to provide a TURN / relay server for their products
- The app needs to connect online. Business users / high end customers:
- A lot of businesses have their firewalls setup to not allow direct connections. You should setup all servers including turn servers. Some users might still not be able to connect even with TURN. This could mean a firewalls is used to only allow HTTP / HTTPS data or even proxys are used. See section Additional Information.
Signaling Server – the details
Find the latest version on github:
https://github.com/because-why-not/awrtc_signaling
Files
- package.json – contains node.js specific information about what other modules it uses
- src/WebsocketNetworkServer.ts – contains the logic. It is simply a list of addresses in use and the users that are connected to these addresses + code to forward.
- src/INetwork.ts – contains the logic for encoding / decoding the protocol used
- src/server.ts – contains the boot code. It reads the config.json and sets up servers accordingly. You might need to change this file to make the server compatible with your hosting provider
- config.json – contains typical settings that almost always need to be changed. More below
- ssl.key / ssl.crt – a self signed dummy certificate for testing secure websockets
Settings (config.json)
"httpConfig":
 {
 "port": 12776,
 "host": "0.0.0.0"
 },
 "httpsConfig":
 {
 "port": 12777,
 "host": "0.0.0.0",
 "ssl_key_file": "ssl.key",
 "ssl_cert_file": "ssl.crt"
 }
This triggers the normal websockets to listen on port 12776 and it will listen on all available ip’s. httpsConfig will do the same for secure websockets. If you plan to use secure websockets you will need to replace ssl.key/ssl.crt with your own certificate. If you don’t want the server to listen on ws or wss simply remove the whole httpConfig or httpsConfig object. Note it is recommended to use port 80 for websockets and port 443 for secure websockets. 12776/12777 is just used to avoid errors during testing as port 80 and 443 are commonly used by other apps as well.
Some hosting providers don’t allow you to pick any port. In some cases the PORT environment variable is used by the server and the settings in the file is ignored. In this kind of setup often only one port can be used thus either httpConfig or httpsConfig has to be removed.
 "maxPayload":
 1048576,
This setting protects the server from oversized packages which could easily fill up its ram and slowing it down / crashing it.
 "apps": [
 {
 "name": "CallApp",
 "path": "/callapp"
 },
 {
 "name": "ConferenceApp",
 "path": "/conferenceapp",
 "address_sharing": true
 }
 ]
Apps are used in the address behind the last /. They allow you to use multiple apps with a single server without the risk of connecting two different apps mistakenly to each other. “address_sharing”: true is a hack currently used to allow multiple users to receive incoming connections on the same address. The signaling server will connect every user to all other users who listen to the same address instead of returning an error.
How it is used
Currently, WebRTC Video Chat and WebRTC Network don’t have a public interface to use the signaling server directly. Instead, it is called indirectly via the IBasicNetwork, IMediaNetwork and ICall interfaces.
Unlike other software designed for WebRTC signaling this server is kept as simple as possible. In fact, it isn’t even aware of the signaling process or of the content of the messages. All it does is connecting users based on an address and relaying their (binary) messages. This is done to avoid having to change the server and break compatibility with older versions of the Asset due to changes in WebRTC or the asset itself. It also makes it easier to combine it with an existing infrastructure. Instead of changing the server it can simply be wrapped. Here are some examples:
The WebRTC Network ChatApp uses it to create a server / client structure. One user can open a chatroom . That user will be the “server user”. Many other users “client users” can then connect directly to the “server user”. The client users will only use the signaling server to establish a direct connection and then cut the signaling connection. Only the server user will keep the signaling connection alive.
WebRTC Video Chat doesn’t make a distinction between server and client. Every user will try to be the “server” role first and try to use the address. If that fails they will connect as a client. Once the first client connected both users will cut the connection to the signaling server while continuing their video chat without any server.
A typical example for wrapping the signaling server: A lot of businesses already have a server that handles usernames and passwords to identify users. In this case an existing system can be used to generate a token. That token can then be used as an address for the signaling server(using secure websockets!). The two users can then establish a direct connection and cut the signaling connection immediately after it. This allows other systems to use the signaling server without having to change the software itself.
A similar approach can be used to extend the functionality: instead of adding new features to the server itself you can create your own server software that deals with your specific business logic and only generates and exchanges random tokens when people actually need to connect directly. An example for this is adding a “phone ringing” effect. For this you can connect users directly first (e.g. via WebRTC Network). Then they can request a phone call using your own custom protocol. The other side receives the request and starts to play the ringing animation. After the phone call is accepted a random token is exchanged which then can be used to establish the direct video chat connection.
Of course if you are not too worried about backwards compatibility feel free to change the server itself. A typical use case for this is to get access to the list of available addresses in use (which can be a security risk for other use cases thus won’t be available by default).
Scenarios & Tutorials
Signaling Server – docker setup
This is the newest and easiest method to setup a signaling server. See https://github.com/because-why-not/awrtc_signaling_docker
If you prefer testing locally or manually want to set up the server please keep reading below.
Signaling Server – local setup
Before trying to run something on a complex server setup it is usually the best to test locally. This scenario assumes you are using Windows but should work fine on Mac as well.
Note despite testing locally via a loopback connection make sure you have at least one active network adapter with an IP address such as LAN or WiFi. WebRTC blocks loopback connections via 127.0.0.1 / localhost.
1. Get node.js and npm
First you will need the packaging manager “npm” and the server application node.js. They come together via an installer from https://nodejs.org. Use the version marked as “Recommended For Most Users” and install it
2. Make sure the installation worked
Open cmd / the terminal and run
npm --version
node --version
It should return a version e.g. “5.5.1” for npm and “v8.9.1” for node.js. If this fails you might need to make sure the binaries are in your PATH variable. You should find more about this via node.js documentation Also some systems might have a very old node.js version pre-installed. If node.js returns a version with a leading number 0 your version could be too old to run the server properly!
3. Extract the signaling server in the folder of your choice.
You can find it in the WebRTCNetwork/server.zip for both assets.
4. Install dependencies
Navigate in cmd/terminal to the folder of the signaling server. Run
npm install
This will trigger npm to install all other packages that are required by the server. They will be stored in the folder node_modules
5. Run the server
npm start
The result should look like this:

This means the server can now receive incoming websocket connections on the port 12776 and secure websockets on 12777 for all available ip addresses on your system.
6. Testing via browser. (V0.981 and above)
The newer versions allow you to quickly test if the server is accessible via the browser using http://localhost:12776. It should print “running …”.
7. Testing using Unity client (on the same machine!)
Now we can do the first test. Use the following data to connect:
Signaling Url: “ws://localhost:12776/callapp”
optional for testing wss (not recommended):
Secure Signaling Url: “wss://localhost:12777/callapp”
Force Secure Signaling: true
Note that testing the secure connection isn’t very realistic on local host as the ssl.key and ssl.crt files of the signaling servers are not created for your specific system and aren’t created by a trusted certification authority. At version 0.98 the native version will still allow secure connections even without a trusted certificate. This might change in the future though.
The Unity CallApp setup should look like the following image. Make sure to set both CallApp’s to the correct settings.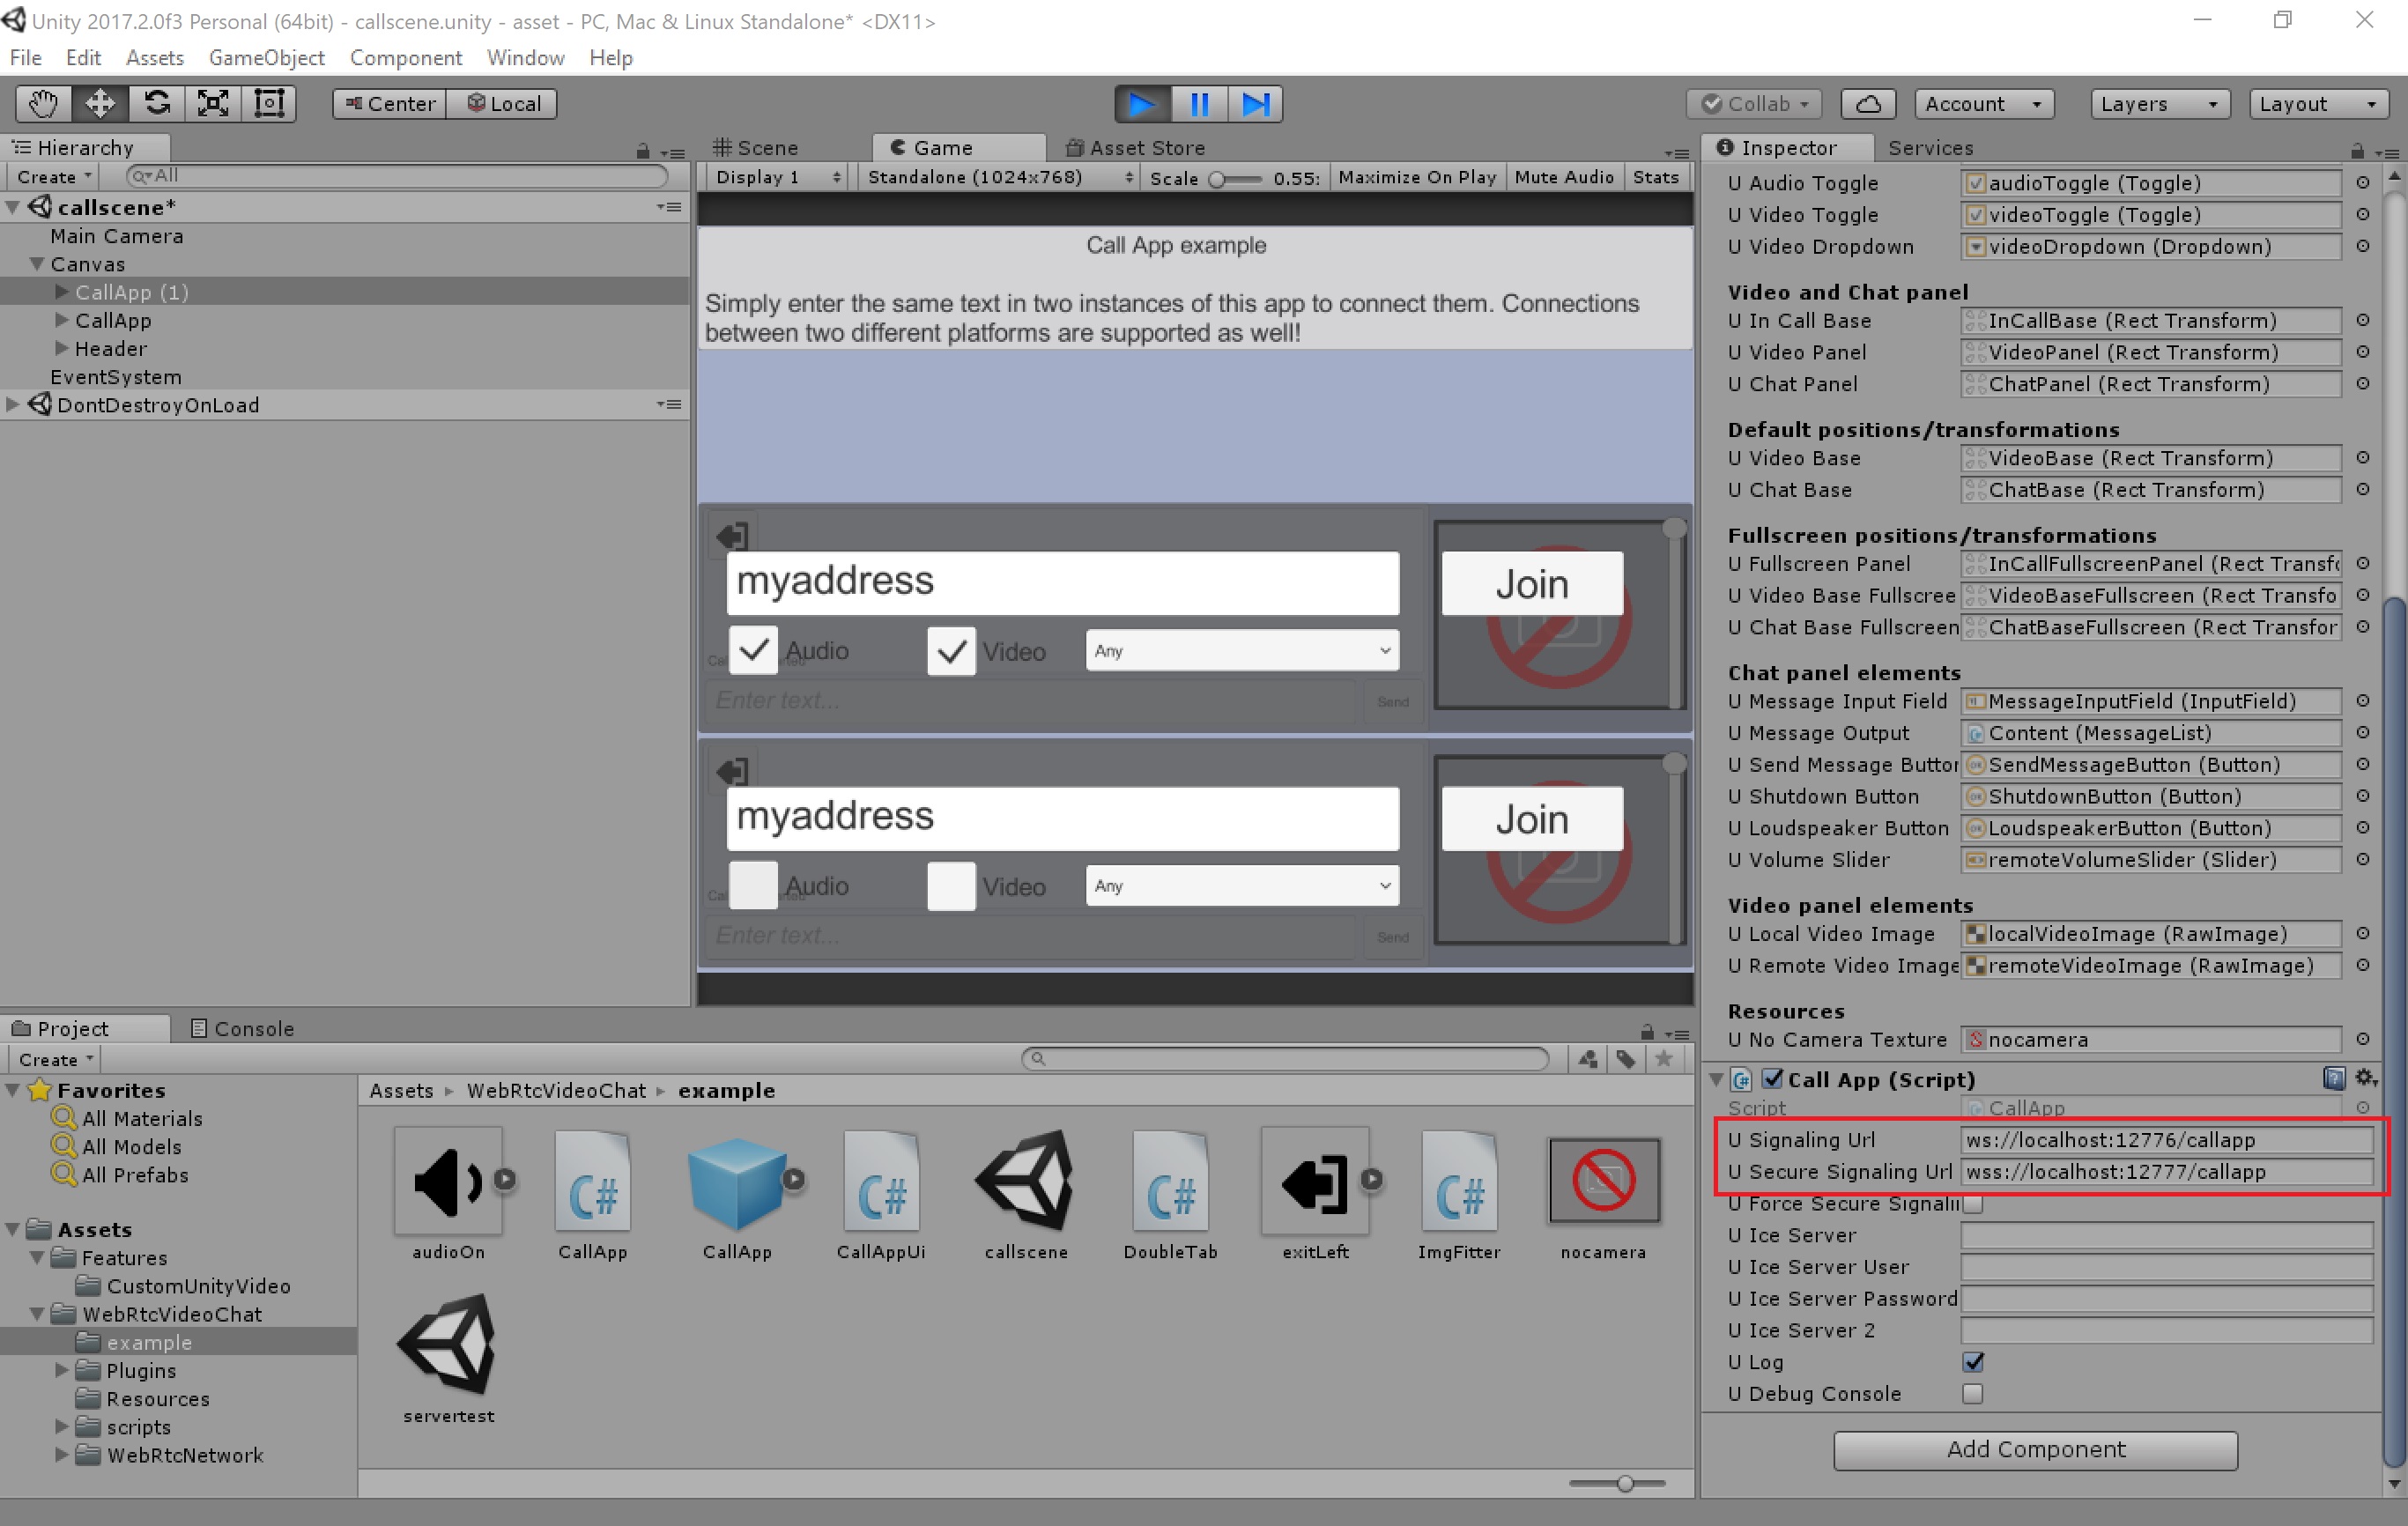
If you press the join button of the top app it should start listening on the server side and wait for the second app. The server should print something like this:
(2017-12-13T05:07:14.468Z)[127.0.0.1:61215] connected on 127.0.0.1:12776
(2017-12-13T05:07:14.518Z)[127.0.0.1:61215]INC: [NetEventType: (ServerInitialized), id: (-1), Data: (myaddress)]
(2017-12-13T05:07:14.519Z)[127.0.0.1:61215]OUT: [NetEventType: (ServerInitialized), id: (-1), Data: (myaddress)]
This means it received the request to use the address “myaddress” and by responding with the same message the server confirmed the address is now being used / reserved.
After the join button of the bottom CallApp is pressed (make sure video isn’t ticked or you risk them trying to access the same camera and fail) you can expect the following output:
(2017-12-13T05:07:17.105Z)[127.0.0.1:61217] connected on 127.0.0.1:12776
(2017-12-13T05:07:17.110Z)[127.0.0.1:61217]INC: [NetEventType: (ServerInitialized), id: (-1), Data: (myaddress)]
(2017-12-13T05:07:17.110Z)[127.0.0.1:61217]OUT: [NetEventType: (ServerInitFailed), id: (-1), Data: (myaddress)]
(2017-12-13T05:07:17.136Z)[127.0.0.1:61217] CLOSED!
(2017-12-13T05:07:17.137Z)[127.0.0.1:61217] disconnecting.
(2017-12-13T05:07:17.137Z)[127.0.0.1:61217]removed 1 connections left.
(2017-12-13T05:07:18.143Z)[127.0.0.1:61219] connected on 127.0.0.1:12776
(2017-12-13T05:07:18.159Z)[127.0.0.1:61219]INC: [NetEventType: (NewConnection), id: (1), Data: (myaddress)]
(2017-12-13T05:07:18.160Z)[127.0.0.1:61215]OUT: [NetEventType: (NewConnection), id: (16384)]
(2017-12-13T05:07:18.161Z)[127.0.0.1:61219]OUT: [NetEventType: (NewConnection), id: (1)]
As you can see first the server responds with a “ServerInitFailed” message as the second app will attempt to reserve the same address. The CallApp then knows that the address is already in use and instead tries to connect to the existing app. After these lines you should see the content of the WebRTC SDP messages and ice candidates that are being exchanged.
Now the two apps should now be connected directly to each other. The signaling connection will be cut by both apps.
Signaling Server – in a single LAN / WIFI
Same as above. You only need to make sure that no firewall on the system you use as server blocks the access (typical the Windows Firewall is the reason for most problems). If the firewall is configured properly you can simply use your computer name or LAN/WIFI IP address instead of “localhost” to access the signaling server within your LAN/WIFI.
Signaling Server – Linux root server / virtual machine
Note if you prefer cloud services and don’t want to work with Linux directly have a look at the heroku version below.
Requirements:
- You rented a typical virtual machine / linux root server. For many cases a simple 5 USD / month virtual machine is enough.
- Ubuntu 16 OS
- Full root access via SSH
- You have a domain name
- You have a fixed public IP without a firewall. If you have a firewall then make sure to open the ports used!!!
First setup
Follow the description here:
https://nodejs.org/en/download/package-manager/
e.g. for an Ubuntu server run the following commands on the server side:
curl -sL https://deb.nodesource.com/setup_8.x | sudo -E bash -
sudo apt-get install -y nodejs
Now follow the steps starting step 2 from Signaling Server – local setup above.
If you are not sure how to move files onto your server the following command might help (run from your local system):
scp -r localfolder username@yourdomain.com:serverfolder
This will copy a folder named “localfolder” to your server user’s home directory subfolder called “serverfolder” (folder needs to exist already). If you copy a signaling server folder over that has been used before make sure to remove the “node_modules” folder first. This is being recreated once “npm install” is run.
After these steps are completed you should be able to access your server via your own domain. e.g.:
ws://yourdomain.com:12776/callapp
wss://yourdomain.com:12777/callapp
Running it automatically on server start
There are many ways you can do this. One way typical for node.js applications is using the tool pm2. Install:
sudo npm install pm2 -g
Note that unlike npm commands earlier this is installing it globally (-g) not just the signaling server project.
To use pm2 to run the signaling server use the following command while being in the signaling server project folder:
pm2 start server.js --name awrtc_signaling
You can check the log with:
pm2 logs awrtc_signaling
Now you still have to make sure that pm2 itself is being started when the system boots. Run:
pm2 startup
This command itself won’t do anything but print the steps you have to take to ensure pm2 will be started during the boot. It should just be a single command you need to copy&paste and run.
Other useful commands are:
pm2 stop awrtc_signaling
to stop the application and
pm2 save
To save the currently running application list. These application will then be started automatically after the next boot.
Using port 80 and 443
If your system doesn’t already use port 80 and 443 for a webserver it is best to use it for your signaling server as some firewalls might block other ports. Usually, these ports require you to use root access but using nodejs as root isn’t particular secure. Instead, you can use following command to give nodejs access to ports below 1024:
#if not installed yet: sudo apt-get install libcap2-bin
sudo setcap cap_net_bind_service=+ep `readlink -f \`which node\``
Now change the config.json to:
"httpConfig":
 {
 "port": 80,
 "host": "0.0.0.0"
 },
 "httpsConfig":
 {
 "port": 443,
 "host": "0.0.0.0",
 "ssl_key_file": "ssl.key",
 "ssl_cert_file": "ssl.crt"
 }
Supporting secure connections – using your own certificate
A certificate usually contains three different entries which are just strings of text:
- The private key starting with —–BEGIN PRIVATE KEY—– and ending with —–END PRIVATE KEY—–
- Your certificate —–BEGIN CERTIFICATE—– and ending with —–END CERTIFICATE—–
- and the certificate of the certification authority. It looks pretty much the same as the certificate.
To add your certificate to the signaling server you can open the SSL.key file and copy&paste the private key into it. The same for the SSL.crt but here you should add both: the certificate and the CA certificate into the same file. For security reasons make sure only the user used for nodejs can access the key.
Note that certificates are only valid for a certain time. You will either have to regularly update these files or use a tool to automate this process.
Supporting secure connections – using lets encrypt
This text is based on https://letsencrypt.org/getting-started/ and https://certbot.eff.org/. Make sure to double check with the original sources as the process might change in the future. Also make sure the following:
- lets encrypt isn’t already used via another software on your server that might interfere
- you aren’t running a webserver on port 80 of the server
Installing certbot:
First go to https://certbot.eff.org/ and select: I am using “None of the above” and then choose your system. It should then show you the install instructions. After following them the “certbot” command should be available.
Now we have two options.
Option a: If you don’t run the signaling server on port 80 a nd the port is free you can use the following command:
certbot certonly --standalone -d yourdomain.com -d www.yourdomain.com --config-dir ~/letsencrypt/config --work-dir ~/letsencrypt/work --logs-dir ~/letsencrypt/log
Option b: If you do run the server on port 80 (WARNING: Works only with version 0.981 and above!):
First make sure it actually works by visiting http://yourdomain.com. It should print “running…” in the browser. Now you can run
certbot certonly --webroot -w /var/nodejs/signaling/public -d yourdomain.com -d www.yourdomain.com --config-dir ~/letsencrypt/config --work-dir ~/letsencrypt/work --logs-dir ~/letsencrypt/log
Here is the command line explained:
- option a: –standalone will cause certbot to start its own webserver on port 80 to provide proof to letsencrypt servers that you are in control of your domain and can add / change hosted files
- option b: –webroot same as standalone but instead uses the build in web server of the signaling server. httpConf.port needs to be set to 80 in config.json and need to stay at port 80 for the certificate to be able to update in the future.
- -w is the absolute path to the subdirectory “public” of the signaling server.
- -d you can add multiple domains that can be used to access your server.
- –config-dir,–logs-dir, work-dir set folders that will be used to store the final certificates, logs and other files. You can also remove these and run certbot as root instead. In this case the files will be stored in default directories e.g. config dir will be /etc/letsencrypt. Note that using root might interfere with other services / application using lets encrypt running on the same server.
After running the command certbot will ask you multiple questions. After you answered them it will let you know where it has stored the files fullchain.pem and privkey.pem. fullchain.pem contains the certificate + CA certificate. It can be used to replace the example ssl.crt. The privkey.pem contains the private key and can be used to replace ssl.key. Either change the config.json to use the files (make sure the user that runs node.js has access rights!) or copy file files over ssl.key / ssl.crt.
Note that your SSL certificate needs to be renewed every 3 months! This can be done manually via:
certbot renew --config-dir ~/letsencrypt/config --work-dir ~/letsencrypt/work --logs-dir ~/letsencrypt/log
If you copied the files over to ssl.key/crt you will have to do this again after each renew. The certbot/letsencypt documentation can help you to automate this: https://certbot.eff.org/docs/using.html#re-creating-and-updating-existing-certificates
Depending on the lets encrypt package you received it might update automatically (this never worked for me). It is best to add an appointment in two months to your calendar and make sure your renewal works! If it fails browsers will refuse to connect to your signaling server after 3 months.
For debugging you can check your certificate e.g. via following command:
openssl x509 -in ~/letsencrypt/config/live/yourdomain.com/fullchain.pem -text
At the lines towards the top of the output it will show you the time it is valid e.g.:
[...]
   Signature Algorithm: sha256WithRSAEncryption
        Issuer: C=US, O=Let's Encrypt, CN=Let's Encrypt Authority X3
        Validity
            Not Before: Jan  9 00:57:25 2018 GMT
            Not After : Apr  9 00:57:25 2018 GMT
[...]
Signaling Server – with heroku
Heroku is a cloud services that allows you to test the node.js signaling server online using a free plan & without having to setup a complete linux server. Only the signaling server is supported though. For STUN/TURN you might still need an alternative solution.
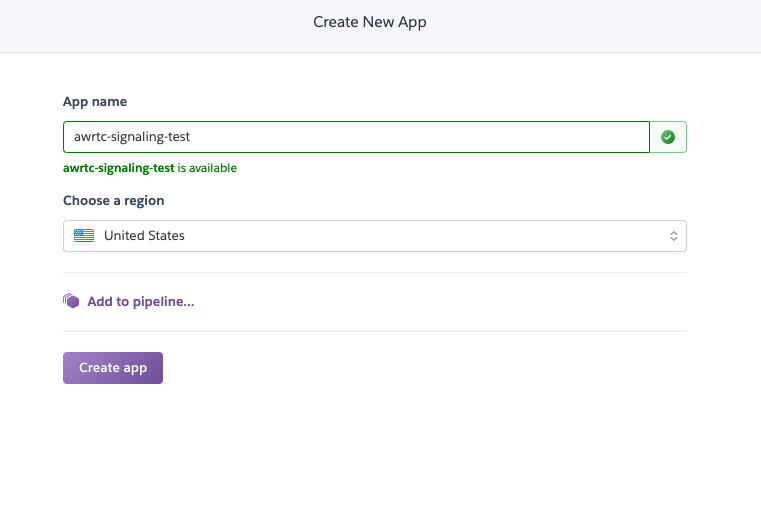
To get started with heroku first you have to visit heroku.com, create an account & login. Then follow the steps below:
Via the heroku web interface go to New -> App and Create your app
On the next page follow the description for “Install the Heroku CLI” and “Create a new Git repository”. After they are completed you should now have your terminal window open, located at your local heroku project directory which is also set-up as a git repository.
Now add the github URL of the signaling server to your project & pull the latest version:
git remote add github https://github.com/because-why-not/awrtc_signaling.git
git pull github master
Heroku won’t need a change in the config.json and will automatically set the port. To upload the default version to your heroku app use:
git push heroku master
After pushing heroku will now automatically build and start your app. To check if this worked correctly run the following command:
heroku logs --tail
It should look like this:
2019-08-21T04:43:58.122701+00:00 app[api]: Release v1 created by user xxxx
2019-08-21T04:43:58.289587+00:00 app[api]: Release v2 created by user xxxx
2019-08-21T04:43:58.289587+00:00 app[api]: Enable Logplex by user xxxx
2019-08-21T04:43:58.122701+00:00 app[api]: Initial release by user xxxx
2019-08-21T04:53:51.000000+00:00 app[api]: Build started by user xxxx
2019-08-21T04:54:13.636550+00:00 app[api]: Release v3 created by user xxxx
2019-08-21T04:54:13.636550+00:00 app[api]: Deploy dc8f76ed by use rxxxx
2019-08-21T04:54:13.654169+00:00 app[api]: Scaled to web@1:Free by user xxxx
2019-08-21T04:54:14.000000+00:00 app[api]: Build succeeded
2019-08-21T04:54:15.670709+00:00 heroku[web.1]: Starting process with command `npm start`
2019-08-21T04:54:17.827429+00:00 heroku[web.1]: State changed from starting to up
2019-08-21T04:54:17.576879+00:00 app[web.1]:
2019-08-21T04:54:17.576896+00:00 app[web.1]: > awrtc_signaling@0.984.0 start /app
2019-08-21T04:54:17.576898+00:00 app[web.1]: > (cd out && node server.js)
2019-08-21T04:54:17.576899+00:00 app[web.1]:
2019-08-21T04:54:17.731376+00:00 app[web.1]: This app was developed and tested with nodejs v6.9 and v8.9.1. Your current nodejs version: v10.16.3
2019-08-21T04:54:17.732753+00:00 app[web.1]: Using verbose log. This might lower performance. Add "log_verbose": false to config.json to deactivate this.
2019-08-21T04:54:17.732941+00:00 app[web.1]: The environment variable process.env.port or PORT is set to 49048. Ports set in config json will be ignored
2019-08-21T04:54:17.733128+00:00 app[web.1]: Only http/ws will be started as only one port can be set via process.env.port.
2019-08-21T04:54:17.733211+00:00 app[web.1]: Remove the httpConfig section in the config.json if you want to use https instead or make sure the PORT variable is not set by you / your provider.
2019-08-21T04:54:17.737550+00:00 app[web.1]: Add new pool /
2019-08-21T04:54:17.737718+00:00 app[web.1]: Add new pool /chatapp
2019-08-21T04:54:17.737798+00:00 app[web.1]: Add new pool /callapp
2019-08-21T04:54:17.737876+00:00 app[web.1]: Add new pool /conferenceapp
2019-08-21T04:54:17.737945+00:00 app[web.1]: Add new pool /test
2019-08-21T04:54:17.738005+00:00 app[web.1]: Add new pool /testshared
2019-08-21T04:54:17.753451+00:00 app[web.1]: websockets/http listening on  { address: '0.0.0.0', family: 'IPv4', port: 49048 }
Keep the terminal window open in parallel to check the log during all further steps.
Your app should now be online and can be tested via the URLs: http://yourapp.herokuapp.com and https://yourapp.herokuapp.com. When you visit the URLs they should print “Running…” in your browser window. The heroku log should also print a few log message each time load the page.
To use the signaling server in Unity open the callscene and update the signaling and secure signaling URL of the CallApp objects (there are two instances of the CallApp! Update both!). The signaling URL should be “ws://yourapp.herokuapp.com” (used for most platforms) and the secure signaling URL should be “wss://yourapp.herokuapp.com” (by default used for WebGL only).
It should look like this:

Now run the scene in the Unity Editor and test if the top & bottom instances of the app can connect to each other. The terminal window with the heroku log should print the messages the app uses to connect the two applications.
You can also publish your WebGL build via heroku to test it in the browser. Simply copy your build into the subfolder out/public (overwriting the existing index.html). Then upload it to heroku via git. If you run into problems double check that you set the secure signaling url correctly using WSS and accessed your app via HTTPS . Many browsers will simply refuse media access if any unencrypted protocol (ws/http) is used.
STUN/TURN using coturn – Linux root server / virtual machine
Install
sudo apt-get update
sudo apt-get install coturn
This will install the application “turnserver” and also change some system configurations (such as adding user and group “turnserver”).
First run
Coturn allows to run the server with a single command:
turnserver --listening-port 12779 --listening-ip YOURIP --user testuser:testpassword --realm yourdomain.com --verbose
- –listening-port decides the port being used. In this case the final address will be stun:yourdomain.com:12779 or turn:yourdomain.com:12779
- –listening-ip flag isn’t always needed but recommended to ensure the server doesn’t listen on an address it might not have access to and end up returning an error. Make sure the IP is a local IP directly available on the host which might not be the same as the public / external ip!
- –user testuser:testpassword Sets username and password for the turn server (by default not needed for stun!). Note that this is just one of many ways of authentication coturn supports.
- If your system is behind a firewall / NAT (e.g. for azure and other cloud servers) you also will have to provide your public IP via the –external-ip YOURPUBLICIP flag and make sure to open the port you used for the –listening-port parameter in your providers firewall / NAT settings
- Optional: The –daemon flag can be used to make sure the application runs in the background and stays active after logout.
- Remove –verbose after you tested the server to reduce the logging spam.
Testing your server
You can use the tool trickle-ice to test your server.
url: “turn:yourdomain.com:12779”
username: “testuser”
password: “testpassword “
The results should similar to this: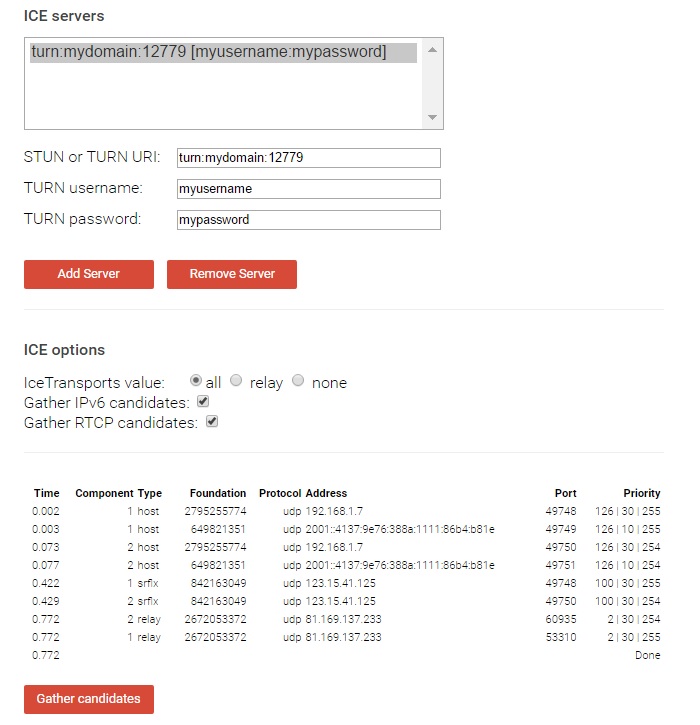
“host” entries are the entries connection directly via LAN / WIFI to your system so you can ignore these to test your server. “srflx” shows the entries provided by STUN and “relay” entries provided by TURN.
After pressing “gather candidates” the “relay” and “srflx” entries should appear. This process can take up to a minute if one of the addresses is slow to respond or unavailable. If you used –verbose to run the turnserver it will also print debugging output information for each connection attempt. If this isn’t the case you might need to check your server settings, url, port and hosting specific firewall / NAT settings.
You can also use the URL: “stun:yourdomain.com:12779” without a username / password. In this case only stun is used. The relay entry will be missing.
Running on startup
Instead of adding everything via command line flags for a proper setup it makes sense to use the file “/etc/turnserver.conf”. This file is automatically used if the turnserver is started. The configuration properties correspond one to one to the parameters for the command used above.
e.g.
listening-port=12779
listening-ip=YOURIP
realm=yourdomain.com
user=testuser:testpassword
You can test the settings by running “turnserver” again without the additional command line flags.
To ensure that coturn will start to automatically edit the file /etc/default/coturn (as root) and remove the # sign in front of TURNSERVER_ENABLED=1. Restart your server and use run “ps -A” to make sure “turnserver” is shown in the process list.
By default you can find the log files at /var/log/ starting with “turn_” but you can change all these settings via the turnserver.conf file.
Additional Information
Here are some tips that might help to improve your service:
- Run the signaling server on the default ports 80 for ws and port 443 for wss. Some firewalls (often used in bigger companies) will block all ports except these two. You might need to use the setcap command to give the process access to it. Also ensure no other webserver application is already using these ports.
- (use with care. Not yet tested on all platforms / versions) Run the turn server on TCP port 443. Firewalls often block all protocols except http and https. By using the default port for https + TCP many firewalls can’t distinguish the two protocols thus let TURN pass. This sadly also means you can’t run the turnserver on the same IP address as a web or signaling server!
Add ?transport=tcp to force the use of TCP e.g.: turn:yourdomain.com:443?transport=tcp
This url will make only turn available. You need to add stun as an additional IceServer entry. - Use different hostnames for each service such as signaling.yourdomain.com, stun.yourdomain.com and turn.yourdomain.com to be able to move servers without having to update your application.
- Study the coturn documentation. It has a lot of features for better authentication. If you just uses username and password others might be able to find these in your application and then use them for their own purposes.
- Ideally set up your own (or use an existing) system for authentication of users. Share stun, turn and signaling url’s only with authenticated users. You can change the signaling servers source code to ensure only known users can connect. It too can be abused to forward data via your servers.